Showing posts with label pizza. Show all posts

Wednesday, June 10, 2015

Big new Grill

In December of 2006 I bought an exciting grill. It is a beautiful grill, but its innards are all cast iron, and cast iron does better in North Carolina than it does in Washington State. We brought that lovely grill out here in 2008, and it's been rusting ever since. It's gone from looking like this:
to looking more like this:
For the past few years, I've been wondering whether the solution to the Great Northwest Grill Dilemna is to buy a ceramic grill. When I was researching our current grill, I spent quite a bit of time studying on the Big Green Egg, although I found myself more drawn to some of the more esoteric kamado offerings (Komodo Kamado anyone?). I've been really fascinated by the whole kamado concept, and I think Ames was almost as curious as I.

So a couple weeks ago, when Ames and I realized it was time to get a replacement grill, there was a reasonably clear path forward.

Of course we did our research: we looked at the various kamado offerings, I pored over websites and blogs and product reviews. And in the end, we settled on the Kamado Joe. Of course I was going to just drop everything and head out to shop that night, but Ames did some research of her own, and found out when the Kamado Road Show would be coming to the local Costco.  In the end, we met the Kamado Joe guy at the Costco shortly after he opened shop, and he was already starting to run low on stock. It took me all of a minute to decide that what I really needed was the Big Joe, and next thing I knew, I was pushing one through the Costco.

But you don't care about my story. What you want to know is how the Joe works, whether it's pretty, and whether I've joined a cult.

We set up the Joe Friday night, with the help of a good friend who was willing to come wrestle a 250 lb grill out of the truck at a moment's notice.

The next morning I decided to put it through its paces.

To start, I took the thermometer out of the Joe and put it in boiling water. Yep, it read 210°F. That wasn't good enough for me: I spent several minutes adjusting it (and burning my fingers) before getting it back to 210°F. This time I was smart enough to leave it alone.

Next it was time to put some charcoal in it and see what it would do. The Joe has a grate in the bottom of the "firebox" that appears to be cast iron:
I took a charcoal chimney full of briquettes, put about a third of them into the grill, and lit the other two thirds. Once they got more or less lit, I dumped them into the grill, shut the lid, threw open the top and bottom vents, and started the stop watch.

The thermometer I had so carefully calibrated in boiling water was reading 500°F in ten minutes. Then I closed both the bottom and top vents and gave it a while. The fire went out, the charcoal got cold, and I had about half the charcoal left, ready for the next burn. You heard that right, this is a charcoal grill you can turn off! How awesome is that?

The first real cook was pizza; it was not successful. I made three errors:

  1. the dough was too wet
  2. I put in the pizza stone too early 
  3. I used briquettes.


The next night we tried again,  and it turned out well.  This time I lit the grill and let it get up around 500°F before putting in the pizza stone, then I let it continue to heat until it hit 700°F.

Although I didn't get a photo, the temperature was actually at 800° when I put in the first pizza.

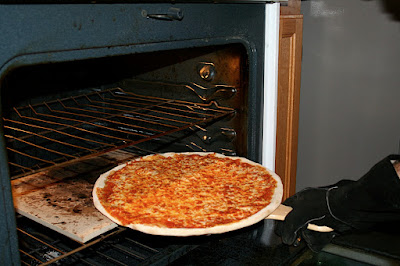
The thicker pizza dough did the trick: the pies were sliding right off the peel and onto the stone.

Pizza cooks pretty quickly at 700° to 800°F. I didn't actually time them, but they were definitely cooking in less than ten minutes.


I used the Weber pizza stone my wife bought me many years ago: Apparently there is a Kamado Joe Pizza stone for this grill, but I haven't actually got one. The Weber is working well enough for now.


One problem I've had in the past with grilling pizza has been getting the top and bottom of the pies to done at the same time.  It's really easy to get a raw top and a burnt bottom. The ceramic grill works wonders: the pizza is done evenly top and bottom.


The thicker dough definitely rose into a nice crust. It was a little thicker than I like, but it was definitely a nice looking slice of pie!


It's true that pizza isn't the main reason I bought a new grill, but I've been excited to see how it works. I have to say, it was everything I hoped it could be.


Friday, September 5, 2014

Cheese pizza

It's National Cheese Pizza Day. Seriously, I didn't even know that's a thing.

We're celebrating.

Wednesday, December 5, 2012

Conclusive

I've decided on my favourite pizza toppings. By far, I prefer plain cheese pizza. But if it's gotta be topped, my favourite is pineapple, black olives, green olives, red onion, and jalapeno. Go heavy on the jalapeno. And if you add slices of a garlic clove, it really does get just the tiniest bit better.

Saturday, April 16, 2011

Unexpected arrival

We made pizza last night. And it was good. Really good. Really, really good. I think we've finally figured out how to make good pizza.

From Really Good Pizza


The crust was thin but chewy, with lots of air bubbles and a definite structure; but it was soft and bready, not pastry-like.

From Really Good Pizza


The crust is certainly the single most important factor to good pizza. We started out making the dough he night before, refrigerating it immediately, and letting it rise just before using it. That worked very well, but we thought we could do better. We've tried several different things to make it better, but we've really only been able to improve a single aspect of the crust at a time; at the cost of others.

This time we made the crust the night before, let it rise and punched it down a few times overnight, and portioned it into crust-size dough balls the next day, which we refrigerated until an hour or so before we used them.

I've been told the secret to good bread is to let it rise many times. All my experiments appear to confirm this statement. Certainly this last batch of pizzas seems to do so.

From Really Good Pizza


So I guess we can stop making pizza now. We appear to be at the top of our game.

Friday, June 18, 2010

Grill pizza stone

In an effort to make the Redneck Pizza Oven a more repeatable experiment, I've been looking for a pizza stone designed for use on the grill. Then Ames bought me this one from Weber as a gift. I gave it a whirl yesterday.

The pies made on the stone bubbled nicely and looked actually rather picturesque:
From Grill Pizza Stone


From Grill Pizza Stone


But when we cut them, we realized the bottoms were charred to almost inedible:
From Grill Pizza Stone


It appears we've been able to get the stone good and hot, but the air above it is too cool. We had this problem last time, and ended up shovelling live coals around the perimeter of the stone to get that temperature up:
From


So it seems we need to make some arrangement like that.


The stone itself appears to be exactly what I was looking for: it handled the heat just fine, although I was half-afraid it would crack. It's marketed specifically for use on a grill, and I read the directions very carefully: I used it exactly in accordance with the directions in the box.

It doesn't look nearly so picturesque now that the stone's been a little charred and the metal's been a little blued, but I have to say it's extremely promising. I think this is going to become a centerpiece of our future pizza explorations.

From Grill Pizza Stone


From Grill Pizza Stone

Sunday, March 7, 2010

Redneck Pizza Oven

I've been playing with pizza for several months now. Of course, to really make pizza, you need a brick oven. I've been trying to figure out how to do that for a few months. Then one day, my boss sends me this link, of a guy who turned a Weber 22" grill into a pizza oven.

"Hey," I thought, "I can do something even easier on my grill! If a Weber can make pizza, a real grill can too!"

So I decided to make a redneck pizza oven.

We're on our third pizza stone since July. I bought one by Oneida, and it worked fine until it cracked (about 4 weeks after I bought it). Oneida kindly replaced it (with no questions asked, I might add), but the replacement cracked 6 weeks later. I finally bought the good one: the Williams Sonoma version. So far no cracks.

But since we have two broken pizza stones, I decided to reassemble them, jigsaw-puzzle-style for my pizza oven floor.
From Redneck Pizza Oven


The oven itself is made by placing four landscape bricks on my grill. They prop the lid open and shield the walls to keep heat in.
From Redneck Pizza Oven


So with the landscape bricks in place and the two Oneida stones shoved back together, we have the start of a pizza oven.
From Redneck Pizza Oven


I've found my pizza peel is sticky. I thought that was just my own incompetence until I used a friend's. The thing is, I have a $5 pizza peel, and it's varnished. So I took sandpaper to it. The improvement is indescribable. This afternoon I tried putting some cornmeal on the peel under the pies, and it worked like a charm. Not one pie got folded! I might have used too much cornmeal on the first pie.
From Redneck Pizza Oven

From Redneck Pizza Oven

From Redneck Pizza Oven


We realized with the first pie, the lid is too high. We ended up taking too long to get the top of the pie cooked appropriately. I didn't get any pictures of it, but we solved the problem by putting a reflector atop the bricks. So you can't see it, but there is a secret lid about 6" over the pizza stones under the grill lid.

The first reflector was cardboard. It burst into flames after two pies. Ames suggested we try the vanity cover I took off the front of the grill a couple years back (she is, after all, the brains of the operation). Whaddya know? It fits perfectly, it's steel, and it doesn't sag. The pies got a lot better after that one.

We made half a dozen or so pies. They all had a nice char on them, and a hint of smoke
From Redneck Pizza Oven


I soon realized I needed more heat, so I started shoveling burning charcoal right onto the cooking grates next to the pizza stones. It made the pies a little more ashy, and the effect was fabulous
From Redneck Pizza Oven

From Redneck Pizza Oven

Of course, one of the pizza stone pieces cracked again where one of the coals was touching it.

So the Redneck Pizza Oven worked like a champ.

But of course there are some improvements to be made. We need to find a better cooking surface. Reassembling the pizza stone jigsaw puzzle is going to get old pretty quick, and they're just too small. I'm open for suggestions: I've looked for unglazed tile and quarry stone, but I can't find either around here. I've thought of using a cast iron griddle too. Either way, I have a 19.5" deep grill. I want a cooking surface big enough to make at least 18" pies, if not full 19 inchers.

I'm not convinced our reflector is as good as it could be. I'd like to see if I can get something a little more draping. But Ames' version is a lot better than the cardboard ghetto-lid I had made.

And of course we need more practice.

But all in all, the experiment was a success.

From Redneck Pizza Oven

Saturday, December 26, 2009

That's Amore! (Reprise)

I had previously posted a pictorial step-by-step to how we've been making pizza. The pictures Ames took were fabulous. But two things have made me decide we need a follow-up:

  1. a couple people have asked me about the technique, and seemed to think what I posted before wasn't too clear

  2. we've made a couple recipe and technique adjustments.


From Pizza Reprise


So here's an update of our step-by-step pizza making guide:

The Crust
The place to start is with the crust. I originally used a recipe I found online, but I've adjusted it to our taste. My recipe uses sourdough: I have a starter that took some sweat and tears to get to its current maturity. If you're in a hurry, you can make a starter that works by just throwing a tablespoon or so of dry yeast into two cups of flour and two cups of water; put them all into a jar and put it into the fridge. Feed it once a week. If you want something more authentic, you can check out some recipes on sourdough.com, Accidental Scientist, or S. John Ross. You can also buy a starter from Sourdoughs International, among other places. My own starter is an adulterated biga, as I mentioned before.

So here's the crust:

  • 2 C. sourdough starter

  • 4 C. water

  • 2 tsp dry yeast

  • 3.5 tsp salt

  • 8--14 C. flour


Put the water, yeast, salt, and sourdough starter into your kitchen machine (or bread bowl) and let it sit for 20--30 minutes. Then start kneading. Knead it wet for 10--20 minutes, then add enough flour to make a sticky ball of dough. Turn it onto a floured board and shape it into a ball. Refrigerate this overnight.

That's enough dough for six 16-inch pizzas or 8 12-inch pizzas. Always make the biggest pizzas you can handle! the best pizzas I've ever eaten were 20-inch monsters from Luigi's Pizza in Charlotte, NC. Larger pizzas have better sauce-to-crust ratios, and more manageable slices. I make 16-inch pies, because that's all I can fit into my oven.

The Sauce
The crust is the heart of your pizza: the sauce is its soul. I made horrible pizza for years, until I learned my sauce was too complex. To make truly great pie, use the simplest possible sauce.


  • 8 whole peeled tomatoes from a can. I find S&W is the best, but Hunt's are good too. Don't buy crushed tomatoes or tomato sauce your pie depends on getting this right!

  • 1/2 tsp. salt

  • 1/4 tsp. white sugar. I like to use berry sugar, but granulated sugar works just fine.

  • a hint of oregano. I used to use 1 Tbsp., but I've come to believe that's vastly too much. I now use just enough to see.
    Less is more, in this case.


Rinse your tomatoes in running water, pour off all the liquid. Put all the ingredients into a food processor or blender and pulse until it is a fine sauce. Don't puree!!! there needs to be some texture to your sauce. This is pizza sauce, not ketchup. I use a hand blender and a measuring cup. This picture is old, I use a lot less oregano now. But you get the idea.
From That's Amore


Assembling the Pie
Shaping the pie takes some practice. I can describe it to you, but you need to make a bunch and learn the feel.

First, take the dough out of the refrigerator and let it warm a couple hours.

Preheat your oven to 500F.

Put some flour on the counter, put the dough ball on it, and gently pat the ball into a disc. Turn it over several times so both sides are well floured. You don't want to dry out your dough by over-flouring, but you need to ensure it's not sticking. Once you get a fat disc, it's time to start stretching it.
From That's Amore


So lift the dough, and start to gently stretch the edges. The middle will begin to stretch to fit the edges. Once it gets loose, toss it hand to hand. The trick here is to gently tease it into a more or less uniform disc about 16 inches in diameter.
From That's Amore


If you feel adventurous, you can toss it overhead. I have had only small success actually tossing dough. Sometimes it works, more generally it doesn't. Be careful catching it, if you catch it on your fingers, you might well puncture your crust.

Once your dough is more or less the right size, place it on a well-greased pizza pan. Now's the hard part: gently shape it to the pan. Whatever you do, don't push the dough down onto the pan, lift and stretch. Using gentle lifting and teasing motion to shape the dough. If you keep upward motion, the pizza will be looser in the pan.

Once the pizza is in the pan, sauce it. Cover the crust, but don't overdo the sauce. Less is more.

Over the sauce, sprinkle some dried (ground) parmesan. This will add a hint of salt to the pie that's very subtle.

Over the parmesan, sprinkle mozzarella generously. It's easy to overdo the cheese, so use caution. But cover the pie up to the edges.

From That's Amore


Baking
I put my pizza stone on the bottom rack and but the top rack on the second-highest level.

The pizza goes on the top rack until the crust and cheese begin to brown. I used to put the pizza pan right on the stone, but I found I get better spring in the crust if I let it cook to firmness on a higher rack with more airflow.

Once the crust is starting to brown, I move the pan down to the stone. From this point, I check it every minute. When it's almost done, the pie will release from the pan. As soon as it releases, I slide the pan out from under the pizza and let the pizza finish on the stone. It only takes a minute or two, but the final couple minutes on the stone crisp up the crust and let the cheese caramelize a little.

If you do it right, you end up with a pie that's a little brown on the top, browned on the edges, and puffy on the edge, thinning in the middle.
From Pizza Reprise


So that's it. Let me know how this works for you.

Friday, November 27, 2009

A piece of pie

Today we braved the crowds to pick up a couple things we needed to buy. We decided to eat out, and went to check Pizzeria Fondi. This is one to watch.

If I were to open a restaurant, it would be a lot like Fondi. The menu is sparse: two pasta dishes, several pizzas, some salads, a couple appetizers, and some desert. Some might look at that and see a lack of selection, I look at it and see focused effort.

The pizza is good. I'm afraid nothing will replace Luigi's in my estimation, but the pizza was very good indeed. The crust was excellent: light and chewy, slightly charred and thin. The sauce was a little too sweet for my taste, but still very good. They advertise house-made mozzarella on their pies: I can't speak to whether that's true, but the flavour was certainly not lacking.

Of course I ordered a cheese pizza: that's always my first choice. They've earned a second visit with their efforts today, so next time I'll order a pizza with sausage and onions.

Fondi's restaurants are all in the Puget Sound area, but if you're ever here, you really need to check them out.

Monday, October 19, 2009

That's Amore!

There's been some interest about our pizza-making adventures. When we moved out here, we quickly realized this isn't really pizza territory. We finally decided we needed to make our own. So at least once a week we whip up some pizzes. Ames took some photos of our pizza-making session last night, and I thought I'd sort of walk through how we did it, and what came out.

First a quick note. There are many styles of pizza, and there are excellent pies in every style. My personal favourite is "New York" style: the pies are large, but thin. The crust is thin and chewy, not crispy. This is the style I've been trying to perfect in our kitchen.

Start with the dough. Pizza crust needs to ferment at least overnight before trying to use it; so I always make the dough as early as I can. This weekend I used dough Sunday that I had made on Saturday, but I prefer to let it sit longer than that.

As I documented previously, I originally started with a recipe supposedly from Peter Reinhart. That works pretty well, but we've tweaked it a bit. So here's what I used this weekend:

  • 2 cups of sourdough starter

  • 4 cups water

  • 3 1/2 teaspoons salt

  • 14 1/2 cups flour


It was raining on the weekend (in Washington? really?), so I used more flour than I normally do. Just for reference, I generally don't measure the flour. You need enough to make a sticky dough.

The dough was split into six pieces and put into plastic containers in the fridge.
From That's Amore


The next day, I had to grate cheese, make sauce, and prepare toppings before cooking. I started with the cheese. Nothing special, just whatever was cheap at the store. I grated it in my Bosch Universal.
From That's Amore


After the cheese came the sauce. Pizza sauce is best as simple as possible, at least for how we're using it. It shouldn't be cooked prior to the actual baking of the pizza, and should contain as few ingredients as possible. So here's my recipe:

  • 4 whole peeled tomatoes from a can

  • 1/4 teaspoon of sugar

  • 1/4 teaspoon of salt

  • enough oregano to see... I typically use 1 tablespoon


This was a double batch:
From That's Amore


From That's Amore


I put all that into a tub and frap it with a hand blender until it's all mixed, but not totally pureed. It should still have some texture.

From That's Amore


After the sauce, I prepared some simple toppings. I like cheese pizza best, but not everyone agrees with me. So last night we used pepperoni, Italian sausage, red onions, and mushrooms.

From That's Amore


From That's Amore


Now to make the pies...

We let the dough warm an hour or so before cooking. I shape it on a floured counter.

From That's Amore


From That's Amore


I used to cook the pizzas directly on the stone in the oven, but I've found it's very easy to mess them up, and the size of the pizza is limited to the size of the peel. So we got a couple 16-inch pans, and we've started to use this technique:

  1. put the pie in the oven on a pan

  2. half-way through, when the crust is cooked enough to hold its shape, we slide the pie off the pan to finish on the stone


From That's Amore


From That's Amore


So here's a crust spread out on a 16-inch pan:
From That's Amore


Once the dough's been spread, time to build the pizza:
From That's Amore


From That's Amore


From That's Amore


From That's Amore


We cook the pizza at 500F.

Having cooked the pizza thoroughly, we pull it out and slice it:
From That's Amore


From That's Amore


This crust wasn't quite right. The colour is a little pale on the edges. But the bottom looked great:
From That's Amore


From That's Amore


The next pie was a half-n-half: pepperoni on one side; pepperoni, sausage, onions, and mushrooms on the other. That's what Mama Lena's calls a "Coney Island":
From That's Amore


From That's Amore


From That's Amore


And being 16-inch pies, they can be eaten properly: folded and eaten "taco style":
From That's Amore


So that's how we do pizza here. Ames got some good pictures, didn't she?