Showing posts with label food. Show all posts

Sunday, July 20, 2014

Trailer Park Gourmet: Jimmy Mac

Several weeks ago we invited some friends over for Sunday morning breakfast. As we sat eating sausage gravy and biscuits, I was struck with the realization that combining sausage gravy with macaroni and cheese would produce something amazing. We tried it, and it was as incredible as we had anticipated. We call it "Jimmy Mac", it's basically macaroni and cheese, but instead of a white sauce, we use sausage gravy.

We made it again this morning, and I took pictures so that others could vicariously enjoy it.

If you haven't made sausage gravy, it's not that hard. Here's how I make it:

  1. Take some sausage (patties, not links), crumble it, and brown it. I like to get it to a mahogany color, but this morning I just got it to "brown".
  2. Once the sausage is browned, scoop it out of the pan.
  3. Next you need to make a roux. Don't clean the pan! Take equal parts butter and flour (this morning I used 1/2 Cup of each). Put the butter in the pan and melt it completely. Once the butter is completely melted, whisk the flour into it. Once the butter-flour mixture starts to darken, it's time to add liquid.
  4. Slowly stir milk into the butter-flour mixture. If you just intend to pour amazing gravy over biscuits, you can make it pretty thick: but if you want to make Jimmy Mac, you'll want a thinner gravy. I add about 1/2 Cup of milk at a time, and whisk it in until it's completely smooth. The end result is a creamy, silky-smooth sauce.
  5. Once the gravy hits the right consistency, put some (or all) of the browned sausage back into the gravy and stir it all together.
At this point you have sausage gravy.

But since we intend to make Jimmy Mac, it's time to doctor the sausage gravy a bit:

  1. This morning I took a few handfuls of shredded cheddar and stirred them in:
    I whisked those in until I had a smooth cheese sauce, with chunks of sausage in it.
  2. We boiled about a pound of rotini and slowly added it to the cheese sauce:
  3. Once that's all mixed together, we put it into the crock pot (we were making this for a church potluck), and put a handful or two of shredded cheddar over the top:

So that's it: the marriage of sausage gravy with macaroni and cheese. Probably the most redneck food that's ever been eaten.

Thursday, January 16, 2014

This morning when I was walking from the bus stop to my office, a guy asked me if I could spare a couple bucks so he could go and buy a coffee and some food. "Nope, I can't," I replied, "but we can walk over there together and I'll buy you some coffee and something to eat."

He accepted my offer, so we started walking over there together. Along the way, he asked me a couple times if I could just give him $5. I told him I don't like to carry cash, but I'd buy him some coffee and food.

As we walked up the street, a car parked next to us. I think it was a guy going to work at a nearby construction site. My companion stopped.

"Are you coming?" I asked.

"Maybe this guy can give me some money," he replied.

"C'mon, I'll buy you some coffee," I urged. But he wasn't willing to come with me.

"All right, I'm going to work then," I said. And I turned and left.

I guess he wasn't hungry after all.

Saturday, June 9, 2012

Chili

I love chili. A hot dog with a slice of cheese, a few jalapenos, and a slathering of chili might just be the perfect food. A bowl of chili and a handful of corn chips is one of the greatest Epicurean pleasures. But frankly, I'm willing to eat chili all on its own.

I took some chili to a church potluck last Sunday and some people asked for my recipe. Of course I haven't a recipe, but I've been having a hankering for chili anyway, so I just went ahead and made another batch today, taking notes.

I based my chili on a great recipe for Chile Colorado I found online. In fact, you probably want to make that Chile Colorado. It's fabulous.

Let's start with ingredients.

From Chili
Today I used about a pound and a half of ground beef (probably 80/20, I'm not too sure), a dozen New Mexico chiles, two onions, four cloves of garlic, three cans of beans, fresh jalapeno, salt, black pepper, crushed red pepper, and cumin. That's pretty close to the basic chili. I don't always use jalapeno, but I do like some sort of green in there for colour. Last week I used some very mild pepper that looked a lot like a poblano. Use what you like.

We start with the chiles. You can use basically any dried chiles you can get your hands on, but they don't all taste the same. My favourite is New Mexico chiles, but California chiles work well too. I've been known to throw ancho and arbol chiles in too, but I always use either New Mexico or California chiles for a base. In my experience, the New Mexico chiles have a richer flavour than the Californias, but they're noticeably hotter. If spicy food is your thing, the New Mexico are a great choice, but if you're more a "mild" person you might prefer the Californias.

I found this page helpful in listing different chiles and comparing them.

You'll want to wash and cut the chiles. A purist would seed them, but I usually don't bother. If you want to seed them, do it like this: cut off the stem, slit the chile in half, and scrape out the seeds and so on from inside the chile. Like this:

From Chili
If you remove the seeds, you'll find the chiles lose significant heat. But since my family are all into spicy food, I find it easier just to break off the stem and break the chile into about three pieces:
From Chili

When you've got all the chiles broken up and rinsed, put them in a pan with about three cups of water. I never measure the water, it's not that important. Then cover them, put them on the stove on high, and let them reach a boil.

From Chili
When you get a boil, take the chiles off the stove and let them sit for at least 30 minutes in the water. This will allow them to steep, and they'll rehydrate.

When you're waiting on the chiles, you might as well get everything else going. I used to brown the onions, then the beef, then add beans. But I realized I could cut down on grease if I did the beef first. That way, rather than draining the beef fat, I could just use it to fry onions and garlic in. It works out if you think about it.

So we'll put the beef in a heavy pot and get it going. I like to add some salt at this point, but I generally don't add anything else until after the meat is browned.

From Chili
Now when you're browning ground beef, the more you work it while it's still raw, the finer the browned beef will be. I like the meat to be really fine and distributed through the chili, so I work it a lot when it's raw. If you like chunks of meat in your chili, leave it alone and you'll get those chunks.
From Chili

Once the beef is thoroughly browned, take it out of the pan, leaving as much grease behind as you can. We'll use that to brown the onions. If you got lean beef, you might need to add butter, oil, or bacon fat here. They'll all work.

You'll want to get your onions, garlic cloves, and jalapenos chopped at this point. I normally use a mandoline, but today I just chopped with a knife. So I put onions, salt, some red pepper, and some black pepper into the beef fat and got them sizzling. Once the onions are translucent, you'll add garlic and jalapenos.

From Chili

When that all looks cooked enough, it's time to add the beef back in.

From Chili
I put a healthy does of cumin in there too: say a couple teaspoons. I don't know, I didn't measure.

When that all sizzles and you're worried about scorching, it's time to add in beans. Today I used a can of "Chili Beans" and two cans of black beans, but I rarely use the same combination twice. I really like it when I get at least three kinds of beans in there, but today I only had two.

I just dump the beans right on top of the meat and stir them in.

From Chili
I'll frequently rinse the bean cans with water and dump that in too.
From Chili

Now we'll let that cook while we head back to the chiles. Remember those? They're still steeping in the water, so we'll want to turn them into a paste. We'll need a blender here: I use a stick blender most of the time, but today I used the Bosch.

We'll take the chiles out of their bath and put them into the blender. They should be pretty well rehydrated at this point, looking a little bloated and cooked.

From Chili
We'll take them out of the water, not straining too carefully, and get them into the blender.
From Chili
Once the chiles are in there, they'll need some of their bath-water in there too. Not too much, just enough so you can blend them into a paste. I find you need about half the volume of the chiles in water, but it's best to go slow, adding more as you need it.
From Chili
Now you want to blend them into a smooth paste. This can take some time, but you'll want to do it right.
From Chili

Now we just add that paste back into the meat and bean mixture on the stove and stir it in.

From Chili
At first it'll be pretty brown, but after a few minutes it'll develop a nice deep red.
From Chili

Essentially you're cooking's done at this point, but it'll taste pretty rough for at least a couple hours. Let it simmer for at least two or three hours, then taste it again. It should start to taste pretty good.

I have to make a note of this: this recipe needs a lot of salt. The meat and chiles both seem to suck it right up. I probably have at least a tablespoon or two of salt in a batch, and I find myself adding salt through the day. Don't be shy with the salt: it'll make a world of difference.

So that's it: that's my chili. There's no tomato in it, and I find that makes it work really well in a Crock Pot, if you want to go that route. I find Crock Pots do murder to anything with tomato in it, but this chili works great in the slow-cooker.

Tonight we're having chili dogs, and I'm getting impatient!

Sunday, April 15, 2012

Chicken and Dumplings

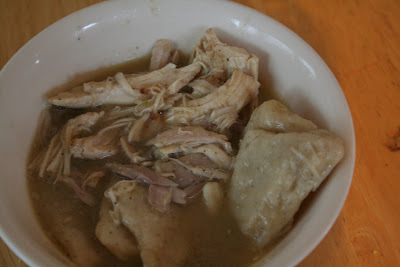
Everything I cook is comfort food. Among my favourites is chicken-and-dumplings. Really, this is the ultimate comfort food. A couple people have asked me for the recipe, and I told them I'd write down what I do next time I make it: it's not like I'm working from a real recipe here. Well... next time was yesterday; so I'm writing it down.

From Chicken and Dumplings

In rural North Carolina, people make "chicken and pastry," rather than "chicken and dumplings." What they refer to as "pastry" is a homemade sort of pasta made from flour, salt, and pepper. Ames makes it with her mother's recipe, but I've made it a couple times using the "Granny's Chicken and Pastry" recipe from Carolina Country. I've made some really good chicken and pastry with that recipe, but I've never been able to follow it exactly. The pastry dough in that recipe always comes out way too stiff.

But I admit I prefer softer dumplings to true Southern "slippery noodles," and so I've mucked about looking for a good way to make those. I've referred to Alton Brown's recipe from Feasting on Asphalt: The River Run, but I've never tried actually following it. My "recipe" is as follows:

Today I used a whole chicken, I generally just use chicken thighs:

  • 1 chicken
  • 2 medium onions, chopped
  • 1 quart water
  • 1--2 quarts chicken broth
First saute the onions in a large pot. I like to cook them in bacon grease, but butter would work as well. Chop them fine, put them on to cook with plenty of salt and pepper (I never measure, I just use enough). When the onions are all transluscent, set them aside and put the chicken in the pot. I've done the chicken in the oven and on the stovetop: I'm not really sure which is better. Today I put a whole chicken in the pot, brushed it with olive oil, salt, and pepper, and roasted it at 385F for an hour.

From Chicken and Dumplings

Once the chicken looked about done, I pulled it out of the oven and put it on the stovetop. I added the onions back to the chicken, put about a quart of water on it, and got it to a rolling boil for about 45 minutes. When the chicken was easily pulled apart with a fork, I removed it from the heat.

From Chicken and Dumplings

Now's the tricky part: we need to pull the chicken from the bones, and we need to make dumplings. So I generally take the chicken out of the pot and set it aside to cool. In the meantime, I get the dumplings going.

Dumplings:

  • 2 Cups flour
  • 3/4 tsp salt
  • 1 tsp pepper
  • 1/2 tsp baking powder
  • 1 tbsp shortening
  • rice milk
That's actually pretty close to Alton's recipe.

From Chicken and Dumplings

I mix the dry ingredients in the mixer and hit them with the whip attachment to get them blended. Then I cut the shortening into the mixture. Finally, I pour a small amount of rice milk (chicken broth, milk, or water would work just as well) into it until I get a sticky dough. This gets rolled out and cut into 1" X 1" squares.

From Chicken and Dumplings

There's never enough broth left from a chicken, so I always end up topping it up. I add about another two quarts of water and then add chicken base to make up a broth. If you have chicken stock lying around, that'll work even better. So now we've got dumpling dough cut into squares and about three quarts of broth: it's time to get them dumplings cooked.

From Chicken and Dumplings

The trick to cooking the dumplings is to get them into boiling broth as quickly as possible, without losing the boil. So I get the broth to a very strong rolling boil and start throwing dumplings in. I find I can easily throw in a handful at a time without having any trouble; but if the boil slows to a simmer, let it get going again before putting in any more. If you're making southern-style pastry, it only takes 15 minutes to get them cooked; but fatter dumplings take longer, say 30 or 40 minutes.

From Chicken and Dumplings

While the dumplings cook, get all the chicken off the bones. I probably throw away too little, but this time Ames picked the bones for me and the meat looked great. When the dumplings look done, add the meat back in.

From Chicken and Dumplings

So that's it. It's not really that hard, but it takes most of a day: there's a lot of "hurry up and wait" with chicken and dumplings. But it's the most comforting comfort food I know, and it's well worth the day's investment to make it right.

From Chicken and Dumplings

Postscript: I got the idea of roasting the chicken in the oven from an episode of "Diners, Drive-ins, and Dives" where they visit Dish, a restaurant in Charlotte about a mile from where I used to work. I generally do the chicken entirely on the stovetop, but when I saw this video, I decided to try the oven. There's an excerpt from it on YouTube: http://youtu.be/BEM2MQoaFH4

Saturday, May 28, 2011

Weekend cooking

We're planning on a "cookout" for Memorial Day (Monday). Most of my team at work is going to come over and we'll throw down with some food from the grill.

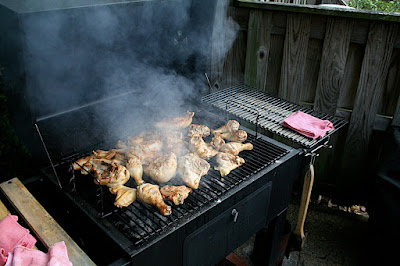
So today I'm cooking one of Ames' favourites: Baptist Chicken. We take some chicken pieces (I've never tried with whole chickens) and barbecue them (~200F for several hours). Once the chicken is completely cooked we immerse it in some sweet and sticky sauce and put it back on the grill to caramelize a bit. Get it? Baptist: full immersion after it's completely cooked. We started making this when we still lived in North Carolina:
From Baptist Chicken


So I put some chicken on the grill this morning: it smells heavenly out there right now.
From Baptist Chicken


Plenty of things taste better than chicken, but nothing smells better. There's just an indefinable goodness to the smell of chicken fat burning on charcoal.


On another front, I took some time off for my birthday (I had too much vacation time accrued and needed to burn some). Since I had the time off, my kids and I made some beer. I came up with a recipe with the help of Beer Calculus, and we put it together.

From Woolen Shirt
From Woolen Shirt

I'm calling this one "Old Woolen Shirt". It seems an appropriate name for a beer of that colour. I followed some advice I found online and have tasted one bottle a week since bottling. We bottled it two weeks ago today, so that's two beers.

The first bottle was not quite flat, but pretty close (at one week). The flavour was really good: caramel-y and toasty with a nice roast barley undertone, but not too sweet.
From Woolen Shirt


One week later and it was a lot more carbonated (at two weeks).
The flavour was still there, but it's a little drier. It's developed a definite yeast bite, but that should fade over time. I'm not really expecting it to be ready to drink until it's conditioned at least another week and then chilled for several more days, so I'm not too worried about the yeasty flavour.
From Woolen Shirt


The colour's dead-on, but it's a little cloudy. It should clear some more with time, but I don't think this one's ever going to drop really clear.
From Woolen Shirt


I'm really happy with this beer. I realize it's still pretty young, but it's very promising. I'll definitely be making this one again soon. I managed to get a huge crop of yeast from washing the trub when I bottled this one. That always helps with the $$$.


I've got one more batch fermenting right now: this one's an amber beer with wheat. I tried to make it lower alcohol, and I'm experimenting with Irish moss and longer fermentation to see how clear I can get it. I'm making this one with yeast I harvested from the Woolen Shirt, so that's a bonus. I haven't named the current batch yet.

Friday, July 3, 2009

Pie!

It's no secret I love pizza. I tend to take Jeff Varasano's view of things: "Pizza is the most sensuous of foods."

From Pizza


North Carolina is not really a pizza state, but in the last decade a number of refugees from New York have brought good pizza with them. In fact, I had the pleasure of introducing at least three New Yorkers in Charlotte to good pizza. That is, I had the priviledge of pointing out that there was pizza in Charlotte made by a fellow ex-New Yorker. It was always a pleasure to see someone's face light up when they tasted "the first real pizza since I came here."

My three favourite pizza places in Charlotte were Luigi's Pizza in Steele Creek, Tony's Pizza in the Galleria, and Brooklyn Brothers in Concord. All three made amazing pies. At one time Mama Lena's would have topped the list, but since their move to Waxhaw, the quality seems to be lacking. Perhaps I got them on an off night: I hope so, because Mama Lena's used to be a thing of rare and exquisite beauty.

But since moving to the Northwest, we've been in a pizza wilderness, in einem trocken und duerren Land, da kein Wasser ist. I hear there is excellent pizza here, but I haven't found it. In fact, I took the trouble of visiting the one place in Seattle I had heard really made perfect pies, only to find out they're closed on Sundays. That was disappointing. Like journeying to Mecca only to find they've moved it.

To exacerbate the situation, there are a few foods I cannot prepare for the life of me. I can't make pancakes or pizza, among others.

So I finally realized no one else could save me, I had to save myself (how very Council of Trent of me!). I bit the bullet, googled some pizza dough recipes, and Ames and I have been trying to learn to make a good pie.

We started with a recipe ostensibly by Peter Reinhart. This recipe is a good one, but not perfect. We've been tweaking it a bit, largely inspired by Jeff Varasano's excellent pizza-making tutorial.

We followed Varasano's lead on the pizza sauce, and we've started to produce some decent pies. We're limited by an electric oven that only gets so hot and can only hold so big a pie, but we've made some that aren't too shabby.

It took a few to start getting them the right shape, so the first few were sort of ugly:
From Pizza


But Ames started making them nice, and was kind enough to give me some tips, so they got more and more round:
From Pizza


But she definitely still holds the record:
From Pizza


From Pizza


Our pizzas still aren't perfect, but we're working on it. Here are some of the tricks we've learned so far, which seem to have made some real difference in the quality of the finished product:

  • The dough needs to ferment at least 24 hours before use. We're following the Reinhart method of fermenting it cold in the refrigerator, but I'm toying with the idea of an on-the-counter ferment.


  • Varasano's auto-lysing advice is good: I've taken to throwing all the dough ingredients into the bowl and walking away for 20--30 minutes while they get to know one another.


  • I've taken oil out of the dough: the dough is now flour, water, yeast, and salt. The oil makes the dough too brittle.


  • We're making the dough a little wetter every time. We don't use the cake-batter-like dough that an 800F brick oven uses, but it's a lot more like custard everytime we make a batch. We have yet to get it too wet.


  • We've thrown out all the fancy pizza sauce recipes and gone with Varasano's advice: we just blend some whole canned tomatoes, add some sugar, salt, and enough oregano to see, and spread it on. We never cook the sauce, and we make it as simple as we can.


We'll never be able to fake the years of experience that Luigi and Tony have, but we're making better pies than we can get through Domino's or Papa John's. That's enough to make us want to make it again, every time.

Here's to good pie!

From Pizza

Sunday, January 11, 2009

For all you northerners...

a brief introduction to barbecue---the original Southern art form.

Saturday, December 13, 2008

Monday, August 18, 2008

Smokin'

So this weekend was the first BBQ in the new place. Oh, we've been grilling, but this weekend we did a slow-cook on the grill for somewhere between 5 and 7 hours.

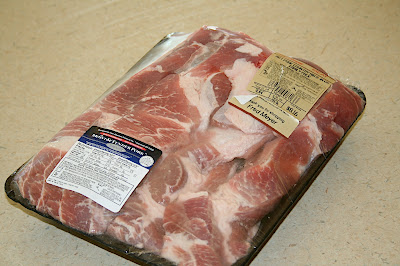
I love slow cooking, so I've been keeping an eye out for cheap cuts of appropriate meat. I stumbled on some reasonable prices at Fred Meyer, so I brought home two packets of meat:

Beef ribs:


and country-style pork ribs:


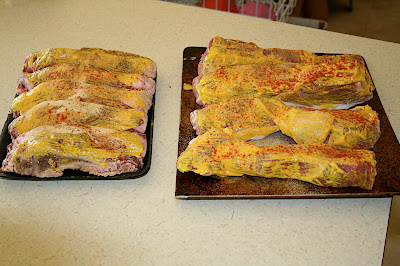
Barbecue can dry out the meat, so I always start by covering them in cheap yellow mustard, garlic powder, salt, pepper, and paprika. I first heard of that from a friend who made incredible ribs. I've altered the style a bit from his technique: he used brown sugar, for example, while I avoid putting anything sweet on meat I'm barbecuing until it's done.


It might be interesting to note that I can't stand mustard. Or ketchup. I have a serious food aversion to ketchup: the thought of eating it nauseates me. I only use mustard to prep meat before cooking.


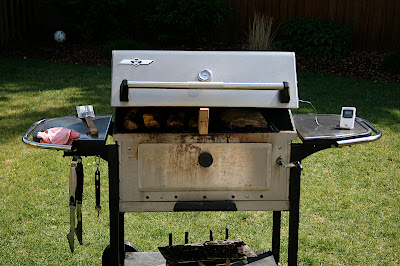
The real key to BBQ is to keep the temperature steady. You want to keep it somewhere between 200F and 220F for several hours. That's difficult to do over charcoal, but 90% of good barbecue is temperature.

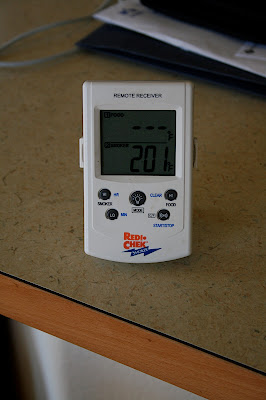
I have a remote wireless thermometer, which makes monitoring it a lot easier. But however you monitor your temperature, that's the most crucial part to barbecuing.


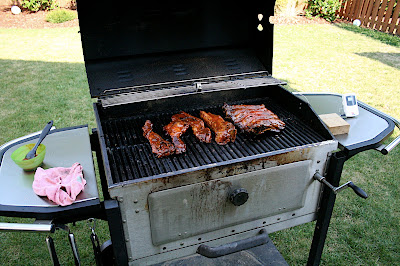
My efforts to maintain a constant temperature sometimes get comical. My grill was too hot closed, and too cool open: so I improvised with a piece of wood. This technique worked fairly well:


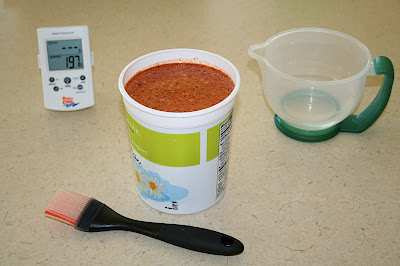
Once the meat has been cooking a bit, it needs basting. Low cooking temperatures do a lot to prevent drying the meat, but even at 200F, the meat will get dry unless it's basted to replenish moisture. I use a mop sauce loosely based on Smoky Hale's "Eastern North Carolina Basting Sauce" on p. 245 of The Great American Barbecue and Grilling Manual. My version of this sauce is a little different than Smoky's, but I think mine gives a more rounded flavour. And mine reminds me a lot of the sauces I've actually eaten in eastern NC. Here's my mop sauce:
2 C. water
1 1/2 C. white vinegar
1/2 C. apple cider vinegar
1 T. crushed red pepper
1 1/2 T. salt
2 t. black pepper
1 T. garlic powder
2 T. paprika
Just mix all that up and you've got a basting sauce.


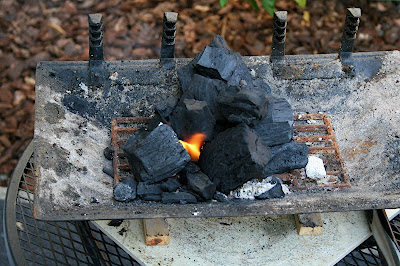
Part-way through the cook I had to stoke the fire, so I used the hibachi as a burn pit. It worked very well.


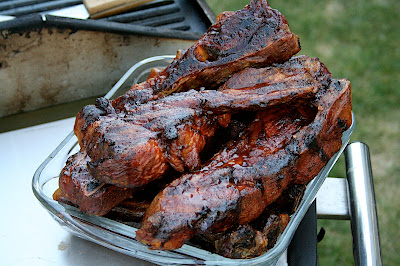
Then, after several hours of basting, the meat was cooked. I covered it in something sweet and sticky (cheap Kraft BBQ sauce cut with my baste to make it spread better), and left them to caramelize a little:


After a couple coats caramelized, I took them inside:


The verdict? Not too bad. The beef ribs were a little bony: slim pickings. But the flavour was all there, and the pork was definitely decent.

Next project: Boston butts. Time to bring some BBQ to the West Coast!